Is necessary to ensure the correct state and operation of the mechanical and electronic parts of the loom to rule out possible open and / or dense by default of machine, for example:
1. Mechanical function of let-off and take-up
· Bearings
· Gears
· Transmission chains
· Supports / joints
· Covering of sand beam and pressure rollers.
2. Temple, wear and type of rings according to the fabric.
3. levers: transmission of the shed former, wastage of the bearings
4. Drive and brake of machine, pulleys and transmission belts.
There is also the possibility that the fabric presents open or dense defects during the weaving process, but these are attributed to defects of some mechanical or electronic component. This report will not review these defects, which correspond to preventive and / or corrective maintenance.
Main Causes:
We will review three main causes that generate the stops marks and starting marks and that in modern looms we have the option to control and regulate.
Machine stop times:
The start marks are more notorious depending on the time that the loom is stopped waiting for its intervention, the longer the stoppage, more severe is the failure; this reason is basically a work method. It must be sought to reduce machine stop as much as possible; with textile adjustments to avoid machine stop or with timely attention; For example, if there is a warp stop on a loom and a filling stop on another loom, the filling stop should be repair first since it is faster to intervene and repair next the warp stop.
Nominal speed:
It is the adjusted maximum speed of a loom during its working process and it differs according to the load or the slow motions of the loom. Here it is important to understand three concepts:
Braking angle: When a machine stop occurs, it does not stop instantly; it has a brake slip depending on the type of drive or the machine speed. This can be from 40 ° to approximately 200 °. It is important to know this information, since it allows us to know how the last picks inserted pass was completed. If this last was during the beat-up moment, it is possible that a open mark is generated; since it will be less than its nominal speed (less force beat-up).
Stop position: After the machine stop has been produced, it is positioned in a specific adjusted degree. The conditions of the position of stopped will depend on the type of insertion of the loom, the ligament and the stopped type; for example, it is recommended, when working a fabric plain, to regulate the stop position at the moment of the shed crossing when a filling stop occurs to avoid stretching the warp during the stop time, until the operator arrives to look for the correct picks and start the loom; similarly when a warp break occurs, adjust a stop position that allows the operator to easily insert the warp through the needles and the reed without the need for additional manual movements.
Start position: After the operator makes the repair or correction of the stop, the machine goes to a starting position degree. The criterion here is to seek that the first inserted picks is beat-up as close to its nominal speed, depending on the machine rpm, the nominal speed is reached only at the third or fourth picks. For example, when the first inserted pick leaves a open mark at the start, what we have to regulate is the position farthest from the finishing point; So we give you more time to reach your nominal speed.
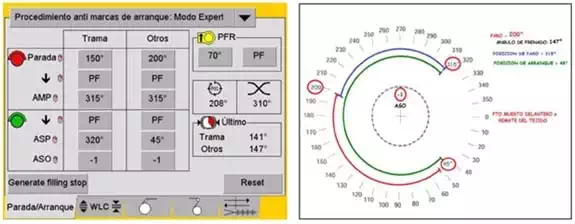
In some modern looms, for example the Picanol loom, is possible to have the option of regulating empty picks (ASO value), in this way, it is possible to achieve that the first inserted picks is beat-up at its nominal speed.
It also has other electronic options to correct stop o starting marks with adjustments in the let-off and take-up system.
In the following image we show an interactive screen for adjusting the start and stop marks of a PicanolOmniPlus 800 loom and on the scale how movements are generated according to the setting made for “others
 |
Warp tension difference:
The difference in tension that affects the stop and start marks is determined by the correct adjustment of the shed. The shed is the tunnel that is formed with the movement of the warps that go up and down according to the design of the fabric through which the weft is inserted and that we will detail some types of adjustments later on.
To regulate a correct shed it is necessary to know some conditions of the style or fabric:
The cover factor: It is a value that indicates the covering property of a fabric, the maximum capacity of warp or weft in a specific space. This will help us determine if the fabric to be worked is a heavy item (> 85% tupidity) or light weight (<65% tupidity) and in this way regulate the appropriate posterior shed.
The following are the formulas for calculating the warp, weft, and total coverage factor.
 |
For example, if we have a fabric with a weave plain (1/1) with a total cover factor of 31.5, with the maximum cover for 37, then we say 31.5 / 37 is equal to 85% of tupidity; This fabric can be considered heavy style.
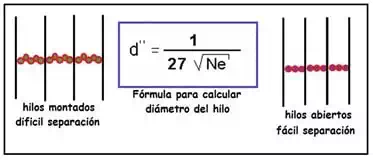
The warp density: It is important to know the amount of warp per reed, if the style has 2 warps per tooth, 3 warps per tooth or more. Also, it is important to know the number of teeth per centimeter. This information will help us to know with what ease or difficulty the warp will crossing in their movement to form the shed. This will help us to regulate the previous shed appropriate to the weave or fabrics.
 |
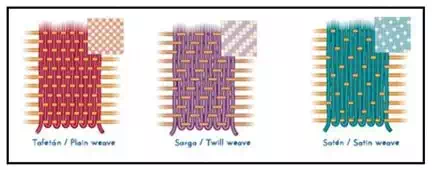
Weave of fabric: Knowing if the fabric is plain, twill, satin or dobby; also if it is a light, heavy or neutral weave will help us to regulate the appropriate posterior shed.
 |
In addition, the shed must have certain important basic characteristics to achieve a “clean” shed that allows a correct separation and movement of the warp and a correct insertion of the weft.
Shed angle: You should start working with the lowest possible opening angle to prevent stretching the warp so much. It must be understood that the more shed opening is regulated; it will require more time to recover the elongation that suffers during the movement of the frames and the movements of slow motion during the stop and start of the machine.
Shed height: It will be restricted or limited according to the type of insertion (air, rapier or projectile). Similarly, what is sought is that during the beat-up of the weft is made as soft as possible. Also, to help warp layers can be individualized and to help separate them easily.
Symmetry: Depending the ligament and the cover factor, different variants of sheds can be adjusted to allow the best work (efficiency) and the lowest incidence of stop marks and / or starting marks (quality).
Gap: Depending the warp density, that is, the ease or difficulty of the warp to separate from each other during the shedding movement, different degrees of gap can be adjusted to help the warp pairs cross at different times allowing a better separation, the best gap frame is achieved in cam motion shed former, because makes the separation at the crossing shed moment.
Tension: According to the yarn title, the type of material, the amount of yarns, the preparation conditions, among other factors, the appropriate warp tension must be adjusted.